BLOGGER TEMPLATES AND TWITTER BACKGROUNDS »
Showing posts with label Scrap Our Stash. Show all posts

Saturday, June 8, 2013

Design Team Project ~Scrap Our Stash~ Stash Challenge #4 - All about Our Guys!

It's time for Stash Challenge #4 - All about Our Guys!
This challenge is all about the Guys in our life! ~ create a layout about a male in your life.   
Stash item: You will need to use (5) or more brads. 
(you do not have to have a heart on your layout) 
********************************
 Boys... My Boyz... are goofs!
Have been waiting to do something with these pictures and, yet again, perfect SOS theme!
Every year we go the last-ish week in November to have Family Holiday photos taken, they know us there... and so they indulge us 'frolicking' a wee bit. Which means some awesome outtakes! Really my eldest, Arthur, should have known better... be careful what you do when your Mother scrapbooks. 
Background is Kraft paper on which I sprayed some Tattered Angels spray over a polka-dot stencil, flipping it around a few times. Then I sponged light green and blue paint through 2 sizes of punchinella (sequin waste) also flipping it around and squishing all the last bits off with a brayer so as not to waste the paint. My Brads are hard to see but each boy's picture has their 1st initial in a Letter Brad and also the line of orange dots marching down the middle of the page. 
I also tacked an 'S' on the end of the title (Chatter Box) to make it 100% authentic boyS.
Titles are My Mind's Eye Bohemia Rub-Ons.
Pattern Paper strip is leftover Fancy Pants Halloween paper.
Chipboard elements are all Basic Grey: Oliver.
Dimensional Pebble is from Prima. 
Orange Brads are BoBunny.
Letter Brads are from the $ store.  
Inks are Stampin' Up!
Pen is black Sharpie PEN. 


Wednesday, May 22, 2013

Design Team Project ~Scrap Our Stash~ SKETCH WITH STASH CHALLENGE #3

I'm BACK!
We *are* moved, YEAH! However we are faaaaarrr from settled.
Sadly, I missed a couple of DT projects because the Studio and all my art-sy type sh-tuff is still in boxes... 
and those boxes are packed in SOLID in the basement.
I've decided that all the little, and not so little, problems during a Move are FUN... and we've been having LOTS of FUN!!! I tell ya. :)
We do however Lurrrrve the new house.
******************************
On with this rounds LO:
Create a layout using the sketch AND from you stash at least 3+ pre-made flowers from you stash.
(no hand made flowers! Remember we are using up our stash!) :)

On May 4th the whole family went down to one of the local Comic Book Shoppe's to help hand out copies of the intro of the Brand New 'The Steam Engines of OZ' comic book for FREE Comic Book day.
FREE Comic Book day every year on the 1st Saturday in May.
Our local Steampunk group volunteered to hand out copies, in full Steampunk dress at both our local Shoppe's. It was a great day... LOTS of people, tons of free comics handed out *and* we came home with a bunch of other titles for ourselves. Yeah, FREE comics!

My supplies are quite limited so I had to be real stash-savy for this layout.
Started by using a Gear stencil and some spray on a plain piece of cardstock because I couldn't find any full 12 X 12 pattern sheets... the rest of the paper came from a bag of scraps from the last Crop I was at. Thankfully it wasn't packed with the rest of my stuff! The white 'pattern paper' is a print off of the samples they had of a few of the new Comic Book pages on the FREE Cominc Book Day website. I also printed off a full color mini-version of the cover to tuck in behind the photo.
My favorite part of this layout in the Pebble Pictures, very 'comic book' looking, they have been in my stash forever and were perfect for this Comic Based layout. :)

Papers, Sticker strip and Title Work: Bo Bunny (various lines)
Flowers, Precious Pebbles and Gems: Prima
Sprays: Tattered Angels
Stencil: Artist Cellar


Monday, April 8, 2013

Design Team Project -Scrap Our Stash- : Dots and Stripes! Birds, Butterflies and Bees!

Scrap Our Stash's 1st April Project:

Dots and Stripes!
Stash: Birds, Butterflies and/or Bees

Create a layout using at least one polka dot paper and one striped paper and either Birds, Butterflies and/or bees from your stash.
******************
 One would generally expect something fluffy and cute with this theme, right?... not me!
Someone said BIRDS and I went oooo... owls and crows! 
AND 
I had just the right pictures waiting to be scrapped!
We are a *major* Geek Family so when I saw an unopened Science Kit at the 2nd hand store that was all about learning brain functions it was a no-brainer (har-har) I snapped it up so my 4 boys could 'experiment' over March Break. We opened it a little early and used the included Jello Mold to make Raspberry Jello Brains for the little 'Welcome Back: The Walking Dead' party we hosted. mmm... Jello Brains! They were a very yummy hit. 
So happy to see these stickers on a layout at last... they are so pretty and sparkly and pretty and... urm, yeah been hoarding them too long.
Scrappin' My Stash!!!
Background striped paper is We R Memory Keepers (Black Out: Uncle Fester)
Both dots are Fancy Pants (Trick or Treat: Trick or Treat Strips)
Rust colored paper is Bazzill
Red Rub-On letters are Make it Special
Journal Tag is from Recollections
Sweet Treats is unknown, part of a long paper ribbon with mixed phrases on it. 
Edged in Stampin' Up! ink.
All Stickers are from Jolee's Boutique (Parcel: Spooky Tree)
Eeks! in title is traced out with a Silver Sarasa pen by Zebra. 
Remaining journaling done with a red Sharpie Pen. 


Friday, March 22, 2013

Design Team Project -Scrap Our Stash- Sketch with Stash Challenge #1

  It's that time again... a NEW Challenge is up at:
Scrap Our Stash
http://scrapourstash.blogspot.ca
The very 1st Sketch with Stash Challenge!
For this one we had to use the sketch provided AND mixed alphabets for titling.
**************
My layout is of our (now annual) trip to the place we had our year-and-a-day-before-the-wedding Celtic Betrothal Handfasting ceremony. On our Wedding Anniversary we go to the same stone we stood on for the swearing that day and we bring a stone from our garden to leave behind. September 25th 2012 was our 2nd Anniversary and we took these pictures on our visit that day. 
We are moving in less than 3 weeks (YEAH!) so almost everything is now packed including ALL my letter stickers so I used some Word Rub-Ons that were still hanging around and an acetate title overlay for my mixed alphas. 
Papers are from the CTMH 'Key to my Heart' page set.
Flowers are Prima. 
Small Flower has some $1 store pearls in the center. 
Washi Tape, Ribbon, Gems, Acetate and Rub-Ons are unknown to me stash sh-tuff.
 **************************
So POP on over the Scrap Our Stash to join the challenge and chance to WIN!
 http://scrapourstash.blogspot.ca/
The Challenge:
1. Create a NEWLY created layout using this sketch:
2. And because we are all about digging into our stash....  
You will need to dig into your alpha stickers, thickers, etc. and create a mixed alpha title or journal.
 **************************


Friday, March 8, 2013

Scrap Our Stash -Design Team Project- Challenge #1 ~ Kraft It Up ~

FIRST challenge on the SHINY *NEW* Scrap Our Stash Blog... there be prizes...
Head on over to take the challenge!
~Kraft It Up~
THE CHALLENGE:
Create a LAYOUT and at least 50% of the products you use on your layout must be Kraft paper and/or embellies.   
Oh, and that's not it!  
You will have to dig further into your stash because...
you must include 3+ metal embellishments..  
You can mix or match the metal embellishments as long as there are 3 or more on you layout.
**********

Someone said metal... *my* brain went Steampunk, as always! 
Time to scrap that stash of photos I keep trying to work through. These pictures were taken when we volunteered to help out Steampunk Ottawa at our local museum's Victorian Holidays event. 
Background paper, Simple Stories,  is kraft-y colored though not actual Kraft paper. 
The foreground paper is printed Kraft paper, also Simple Stories. 
Flower were punched from a paper bag with a Stampin' Up! Punch, then spritzed with Red Tattered Angels Glimmer Mist, another lil spritz of Green under the family photo. 
 Felt holly is from AVON, gems from the $ store.
Metal in the title-work, $ store 'frame' and word.
Sprinkle of Tim Holtz gears here and there.
As well as the rows of alternating Keepsake Craft red and green mini brads. 
...and Yes, I poked myself a few times doing that many brads! lol


Time to dig into your stash and get your Kraft On!  You have until March 29th to get your entry linked up!  We would love to have you join us for this challenge! 
Check back each day for more DT inspiration for our Kraft It Up Challenge!

Monday, February 18, 2013

Scrap Our Stash is hosting a Giveaway A Day!

We have some exciting things going on at SOS next week!
You do not want to miss it!  
To celebrate the launch of the merge with If It's Groovy (IIG), 
New Look and Challenge Format:
Scrap Our Stash is hosting a Giveaway A Day!
Please visit SOS HERE *each* day starting February 25th for details on entering the daily drawings!
  
*****************
 
Welcome to the *NEW* Scrap Our Stash!!!!

Our challenge blog was created to inspire and challenge you to use up the products and supplies you have in your stash! We will post a STASH challenge on the 1st of each month and a sketch challenge with a STASH prompt on the 15th of each month. You will have until the 29th to link up your entry for both challenges to be entered into the monthly prize drawing.

If you complete one challenge, that gives you one chance to win and if you complete the second challenge, you will have earned a second chance to win the monthly prize.  

Our prize winners are selected by Random.Org and our TOP 3 are selected by the Design Team. One of the TOP 3 winners will be offered a Guest Designer position. 

It is important that you read our Challenge Rules. Any entry linked that does not follow all of our challenge rules and the requirements of the challenges will be disqualified. 

Remember the most important thing is to have FUN and work on getting as much of your stash scrapped as possible!

Wednesday, January 9, 2013

Design Team Scrap Our Stash: January TAG YOU'RE IT! Challenge

TAG YOU'RE IT! 
You're challenge is to create a layout using tags and you. 
I know, I know, we do not like being in front of the camera usually, but it is important and a great way to end 2012's scrapbook.  
 http://scrapourstash.blogspot.ca/
************
Grabbed a few pictures taken for an older SOS challenge (squares) and never used.
 Ha! Scrapping my Scrap Your Stash stash
Wanted the LO bright, bold and silly 'cause that's what these pictures were.  
Dug deep and found a Bo Bunny sticker set I bought erm... awhile ago, so long ago can't remember when or what for, that had a BIG Tag sticker on it I used for the Title. Each of the stickers were placed on black cardstock then cut out free hand. I like the 'wobble' of free hand cutting. The title TAG also has a snippet of Stampin' Up! gingham ribbon tucked underneath.
  Pictures were inked in black around the edges to make them POP on the brightly colored background. 
The bit of Queen & Co. Lime Green sticker trim was a snippet of leftovers sitting on my desk. 
Reagular Brads are also BoBunny.
Bling Brads are KeepSake Crafts.
Flowers by Prima. 
Papers are unknown.
Remember: 
Take time everyday to do something SILLY.
 Maybe even a silly LO! ;)


Tuesday, December 11, 2012

Design Team Project for Scrap Our Stash: December 'Circles' Challange

********
I was late getting my page in *hanging head in shame*... The moving gremlins have been playing many tricks. My circle cutters got packed, even though I I didn't pack them. Opened 1/2 my packed Studio moving boxes and they were nowhere to be found. 
Then my printed pictures vanished and magically reappeared 2 weeks later. 
~curious~

 My (late) page is about the wonderful opportunity we had to visit a friends farm the Monday of (Canadian) Thanksgiving Weekend. Our 4 boys all got a chance to try Ax Throwing for the 1st time. My eldest, Arthur, is front and center for this lay-out.

Journaling reads:
1...2...3... THROW!!!
*Beautiful fall day spent at the Buchanan Farm... The Boys were thrilled to try Ax Throwing. Arthur is a natural !!!!*
I ended up going very 'old school' on the circles for this layout, Read: everything is hand-cut!
Was at a small local crop and no one else had a circle cutter there either, so I grabbed the only things I could find to use as guides. Traced  a wide circle around a Styrofoam plate for the biggest circle, when I cut that out and it was a wee lopsided BUT so was the log-slice target the boys were using. huzzah! I meant it be that way (uh-huh...) really. :) The blue circle was an exact tracing of the plate (much better form), the next white circle was traced on a large tin of Prima flowers and the red was the inside of a roll of adhesive.
Really wanted it to look like the target they used so I dragged a light brown ink pad down the 'target' before attaching it to the backing to make the wood cracks. 
Also roughed up the background paper with sand paper and ink. 
This month's mini-themes for me is 'mother-of-invention and rustic', lol. 
Added a 2nd picture with a close-up of Arthur and the target so you can see what I was going for. 


Monday, November 19, 2012

Scrap Our Stash Design Team: November 'TEAR IT!' Challenge

TEAR IT!

Breakout the scraps of paper and start tearing!  
Create a layout using those torn papers in small amounts or abundance. 
You choose!
Head on over and check out join the Challenge:
HERE
 **************
Great idea... LOTS of scraps here! 
Had several pieces of red and pink partial sheets of paper left from making October Breast Cancer Awareness Month cards so... that's what I reached for. Used a photo I've been itching to use too of last February's Starbucks LOVE Cup. Lurve the Love cup and I love coffee... so a page theme was born. Page base is a piece of black cardstock layered over with torn strip of red and pink paper layered over each other, edges all inked. 
Here's a secret: 
Under the photo the strips are NOT connected.
There wasn't enough paper to reach right across so I had to cut the shorter strips in 2,  lay them across from each other and then cover the gap with the big photo.
Letters, hearts, gems and coffee stickers are leftovers from other projects. 
Cheers!


Monday, August 13, 2012

Scrap Our Stash August TIME WILL TELL Challenge ~Design Team~

TIME WILL TELL 
For the challenge this month think clocks, growth, numbers, 
whatever comes to your mind when you hear "time will tell" and dig into your stash! 
******
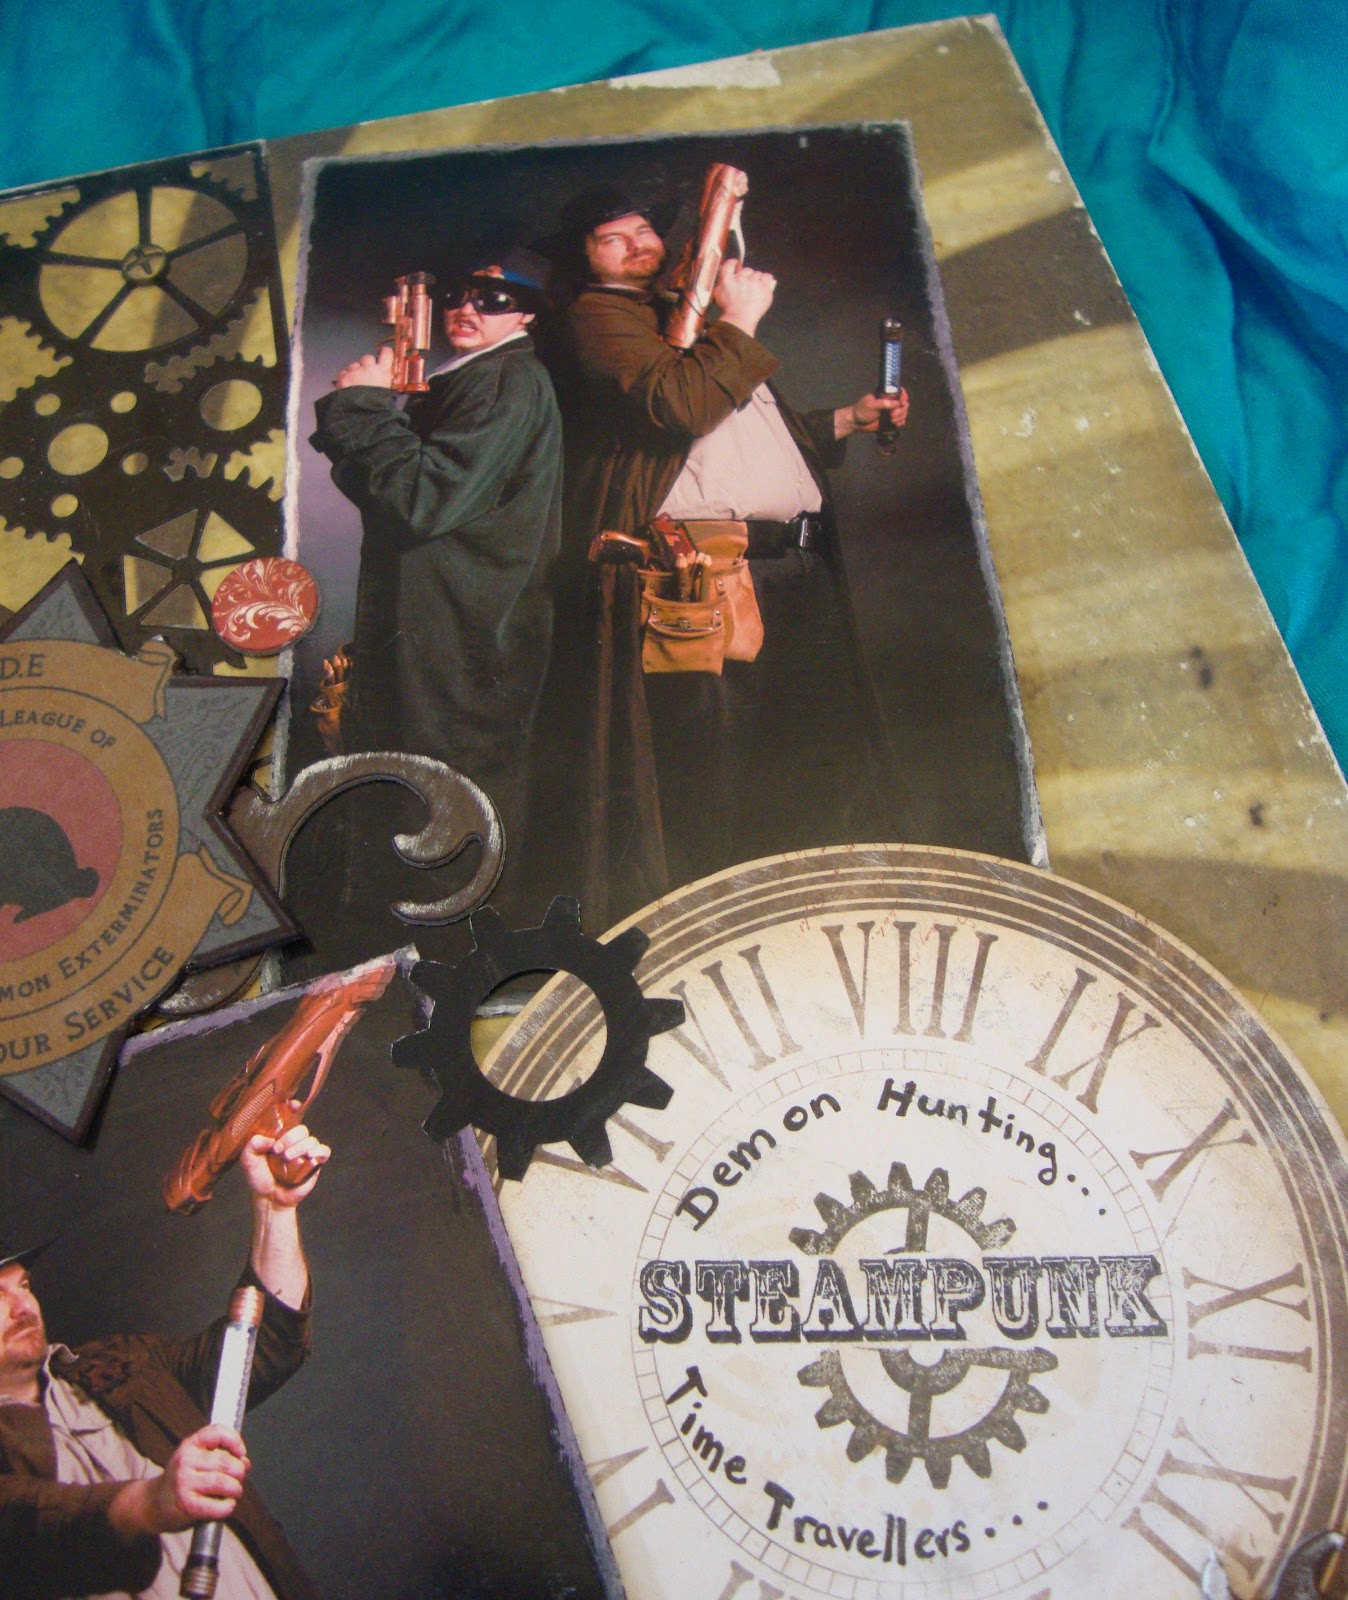
This month I decided, again, to dig into the Steampunk photos taken by the very talented Robert Allard:  http://raphotography.smugmug.com last March. 
Scrap Our Stash Challenges are a *perfect* reason to 'scrap out stash' of backlogged photos too!
This time a couple of pictures of my oldest son Arthur: 1/2 turned Vampire and my husband Greg: Team Leader totally armed and ready to fight evil daemons. 
Started with Tim Holtz paper from the same pack I've been using for many of the pages from this shoot, roughed it up sanding the edges with an emery board. The same treatment for both photos; trimmed with my old dull cutter for a 'shaggy' look them sanded down. 
Embellishments were varied:
Gear Strip is Little Yellow Bicycle Lack Cardstock. A few 'screw head' brads in the centers. Chip board elements came from BoBunny Timepiece collection, also sanded a bit. Stamped the STEAMPUNK in the middle of the blank clockface and then wrote the rest of the title in with Sharpie PEN. There are a couple of Graphics 45: Steampunk Debutante punch-out. Punched Gears were made with a Stampin' Up! Punch using a scrap of paper I had smeared leftover black, red and brown paint on from another project. Waste not, want not! The 'Badge' is an extra print-out of the ones I use to make out group badges... glued onto extra thick cereal board (Honey Nut Cheerios Family Pack... super thick!) and cut out with an Exacto blade. 
Pictures were a bit hard to take since it's very 'lumpy' and shiny here and there.. so I took a few.


Saturday, July 14, 2012

Scrap Our Stash Design Team: July Stars & Stripes Challenge

This month over at Scrap Our Stash the challenge is:
Stars & Stripes

Decided to dig into the Steampunk photos taken by the very talented Robert Allard:  http://raphotography.smugmug.com last March. For some reason this photo came to mind first when I saw the topic. *kabang!* lol 
I loooooove this picture of all four of my boy all set and ready to fight evil daemons!

The base paper is Tim Holtz which is most of the 'stripes' for this layout. Placed the picture on the page, arranging it so the lines were coming out in a 'burst' and drew a light pencil line around the photo for a guide. Then I stamped a few gear with the Gel-a-tins: Shifting Gears set, using Gold ink and then heat embossing them in Silver. The guide meant I wasn't stamping where it wouldn't be seen: So I didn't waste any supplies or energy. 
Then I took both Gold and Silver Sharpies and drew some 'ray' lines coming out, following in the same directions the stripes were already going. 
Next I prepared the photo by placing it on a Light Yellow piece of Mulberry Paper, wetting around the photo, careful not to get the photo itself wet since it's a printer photo and would smudge and then tearing the paper... pulled it off in small bits and pieces to get it really long and raggedy. Then I inked the edges in Bright Yellow ink. I repeated the with Pale Orange Mulberry Paper and Bright Orange ink a little bigger than the Yellow. Attached them to the back of the picture so it looks like the boys are coming out in a Fire-Burst!
The Silver Gears were punched out with a Stampin' Up! Punch and the Copper Stars were all hand cut out using an Exacto knife from DCWV Metallic Stack Paper... yummy paper I've been hoarding. Arranged these and glued them on, then added a sprinkling of Me & My Big Ideas Icons bling-age in Red, Yellow and Orange.
The last step was cutting a My Mind's Eye rub-on title in half... used both halves over top the photo itself and added a few stick-on pearls.
I'm super-duper pleased with how this page turned out AND it's been 'Boy Approved' with an "Awe Cool Mum!" "Neato!" and "WOW!" from the crew. (The eldest nodded, that's as good as you get from the teenager now... lol)


Monday, June 18, 2012

Scrap Our Stash Design Team Page: June HOMECOMING Challenge

 Read all the details for the 
June HOMECOMING Challenge: 
Sooo... 
A project about any changes since joining the Design Team here at Scrap Our Stash:
As an encore to last month's page about our Celtic Betrothal Handfasting Ceremony in 2009 I made a page for our 1 year Wedding Anniversary in 2011. When I joined all the wonderfully talented ladies here at SOS it was January 2011 and I had *just* gotten married. Now we're swiftly heading towards Wedding Anniversary #2. 
The wheels of time keeps turning!
On our 1 year anniversary we had a nice lunch out, then since the weather was so beautiful we went for a walk in the park our Betrothal Handfasting Ceremony was held. We brought a pretty stone from our garden with us and placed it on the large flat rock we'd stood on to say our vows when we had our hands tied together. We also took some pictures... my favorite being the one of our shadows over that special rock. 


Page base is a My Mind's Eye: Life Stories sheet... part of the much drooled on, but barely used stash.
I cut a piece of white vellum to go across the page, it's slightly wider than 12" so I folded the extra around the base paper on each side. Dug out a Fiskar border punch (threading water) and punched along each edge and threaded the ribbon through. Ribbon is a Celebrate It St.Patrick's Day pattern of wee plaid shamrocks. When threading them through I flipped the vellum around so the stems are facing the photos each way.
Photos were cut using the cutter I saved that never worked right... cuts the edges all 'shaggy' which has it's uses... then I sanded them with an emery board. When attaching the largest photo I left is open underneath on the right so I could hide some journaling underneath. Journaling block is from Little Yellow Bicycle's 'Lucky Me' Journaling Tablet. I punched it with another border punch (leave it to weaver), sliced off that strip and attached it the bottom of the block, then punched the top again to match. 
My favorite part of this page is the LYB Clear Cuts Lucky Me 'logo' with the 'EST.2009' on it: The Year of our Betrothal Ceremony. The September is a rub-on from Bohemia. 
Will be slipping this page into the back of our 'I'm still working on it' Wedding Album, lol. 
Now it's your turn to take the June HOMECOMING Challenge. 
See all the details HERE!